Custom detection rules in Microsoft Defender - short guide
Microsoft Defender allows us to create custom alerts and, after they occur, respond to them automatically. This feature is quite useful when you want to detect a situation that’s not always malicious or simply gather information that is not inherently dangerous but could indicate that something is happening in your environment. All the tools we need for today can be found in Hunting:
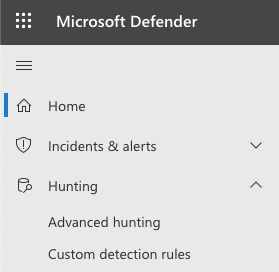
Custom detection rules are stored in section with the same name, there we can manage and edit them. New custom rules, however, are created in Advanced Hunting. https://security.microsoft.com/v2/advanced-hunting
First, we need to determine exactly what we want to find (and alert). Advanced hunting tool is extensive and deserves its own article. For now, let’s start with a basic query for testing purposes:
DeviceProcessEvents
| where FileName in~ ("powershell.exe", "powershell_ise.exe")
| where ProcessCommandLine contains "script.ps1"
That query finds every run of a script.ps1 by powershell process. To create detection rules we need at least Timestamp, ReportID and entity column in projected data.
For example, we can write the following query and we will still be able to create custom rule:
DeviceProcessEvents
| where FileName in~ ("powershell.exe", "powershell_ise.exe")
| where ProcessCommandLine contains "script.ps1"
| project Timestamp, ReportId, DeviceId
However, the project operator, which shows to us “only” DeviceID, limits us to responding only to devices.
Automatic response actions needs different columns (entities columns).
Auto responses on devices use the DeviceID column:

Auto responses for files use SHA1.
Allow/Block actions for files can also use SHA256. In some situations, if you need to allow/block/quarantine the initiating process, you can use the InitiatingProcessSHA1:

Auto responses for users use ObjectID and SID.

Auto responses for emails use NetworkMessageId:

Key values - entities - are always highlighted and clickable:

Let’s create a detection rule.
We now have a few fields to fill in. Let’s start from the top:
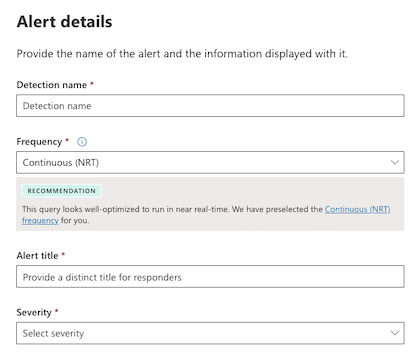
Detection name
Will only be visible in the list of custom detection rules.
Frequency
We have several options here, but the Continuous frequency is not always available. To use this frequency, we must stick to the following tables:
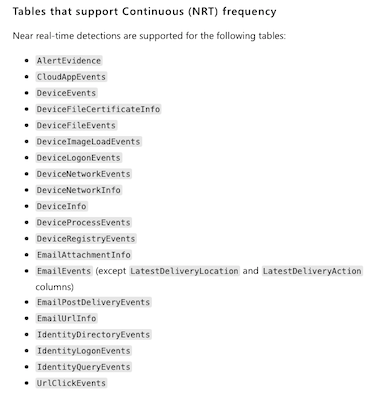
This is generally true, except for the EmailUrlInfo table, where the custom detection rule does not work at all.
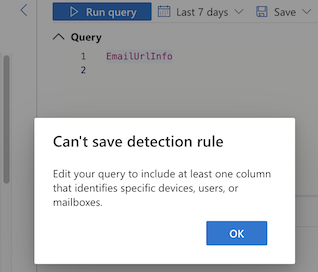
This table does not have an active NetworkMessageID, so it cannot be used as a key value. However, we can join two tables using this value, such as with EmailEvents:
EmailUrlInfo
| join EmailEvents on NetworkMessageId
This will work perfectly, but whenever we use the join operator, we cannot use the NRT (Near Real Time) frequency. To use it, we need to limit our queries to only one table (from the list above).
Let’s go back to the custom rule.
The Alert title and Severity
Those are straightforward and must be filled out according to your needs. The next fields are as follows:

MITRE
When we choose a Category, the MITRE Techniques field will appear. If we write a rule that can be linked to MITRE, it’s always beneficial for incident response actions. Additionally, in the Threat Analytics report field, we can link the rule to a threat listed in the Threat Intelligence menu -> https://security.microsoft.com/threatanalytics3
Description and recommended actions
Those will be visable in alert details so here must by all information needed to incident response and understand alert nature.
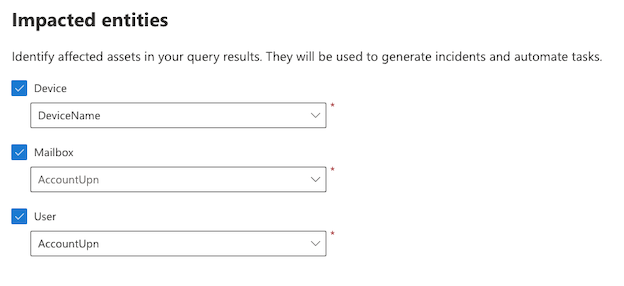
Impacted entities
Will be visable and accessible from alert, so in our situation run malicious powershell will impact device, user and a file. Those setting dosent apply to later automation so we can use more readable options like Device Name or UPN.
Back to automated response
Response to devices
It’s quite complex and I think it’s understandable with the documentation that’s available: https://learn.microsoft.com/en-us/defender-endpoint/respond-machine-alerts#isolate-devices-from-the-network
Example:
AlertEvidence
| where isnotempty( DeviceId)
| where Severity != "Informational"
| where EvidenceRole == "Impacted"
This query finds any alert that isn’t informational where the device is a piece of evidence with an affected role in the alert. Some assets are only related to evidence role in alerts. We can automatically run an antivirus scan on every device that’s impacted by alerts in our environment.
Response to files
Allow/Block creates a custom indicator, but unfortunately, we cannot customize it further. The file is blocked with the following default settings: alert severity set to Informational, the expiration date is never, and alert title set to File blocked by custom detection rule.”
Defender for Enpoint - custom indicator: https://security.microsoft.com/securitysettings/endpoints/custom_ti_indicators
The Quarantine option is more complex, but everything described in the documentation is accurate and works as expected:https://learn.microsoft.com/en-us/defender-endpoint/respond-file-alerts
Response to users
Mark user as a compromised - It’s not a feature as is, it’s fully customizable by us in Conditional Access. This option requires another article, but for now this guide is good enough: https://www.invictus-ir.com/nieuws/a-deep-dive-into-entra-id-identity-protection-for-incident-response-e854e
Disable user - Disable user in AD. Requires additional action to work. More info on how to do this: https://jeffreyappel.nl/defender-for-identity-response-actions/
Force password reset - User must change password at next login. Note that this option is not preferable if the adversary knows the user’s password.
Example:
AADSignInEventsBeta
| where RiskLevelDuringSignIn == "100"
| where isempty( DeviceTrustType)
| where ErrorCode == 0
This query finds any successful login with high risk from untrusted device. After this we can disable user or mark as compromised.
Response to emails
To use those option we need diffrent KQL query. Let’s train with this:
EmailEvents
| where SenderFromDomain == "mail.com"
| where DeliveryAction == "Delivered"
Move to mailbox folder - here we have several different options:
Junk - deliver mail to Junk folder
Deleted Items - deliver mail to Deleted Items folder
Inbox - deliver mail to Deleted Items folder, also works for quarantined mail
Move back to Sent Items folder - of course this will only work for organization emails.
Delete email - here we have two different options:
Soft delete - can be recover
Delete sender's copy - also delete from sender folder
Hard delete - can’t be recover
Example:
EmailEvents
| where EmailDirection == "Intra-org"
| where DeliveryAction in ('Junked', 'Blocked')
| where RecipientEmailAddress == "securityteam@yourorg.com"
This query finds all emails sent within an organization that are blocked or junked by a specific recipient. Sometimes users send mail to security team, defenders do not always delete/detect malicious mail after first delivery, sometimes users react faster than ZAP function. Of course, this is preferable when users send mails to each other. But we can alert ourselves that user wants to send us mail with alert or just release from quarantine to inbox.
Response to attachments
EmailAttachmentInfo - has three key values so we can automate response about user, attachment and email. Important is that files from attachments are only in SHA256.
Example:
EmailAttachmentInfo
| where FileType == "exe"
| where SenderFromAddress endswith "yourorg.com"
This query finds any attachment with .exe file sent within the organization. We can block .exe files sent into our organization from the outside by policy, but the security team sometimes wants to know when .exe files (or others) are sent within users.
Response to URL
EmailUrlInfo - this table is corrupted because it does not have key value for email (NetworkMessageID), but we can join EmailEvent table and after that we can set detection rule. But remember that whenever you use join operator in query continuous frequency is disabled and can’t be selected.
Example:
EmailUrlInfo
| where Url contains "somemalicous.com"
| join kind=inner (
EmailEvents
) on NetworkMessageId
This query finds any email with a pointed URL.
Summary
After choosing the automatic answer, we can summarize the whole rule and save it. Remember that the first run will find every occurrence of what we’ve found in the last 30 days.
Edit saved rule
In Custom detection rules section in Hunting we can find all the rules we made.
Run - run the rule manually
Edit - edit settings like description, automatic response or frequency
Modify query - we will be redirected to advanced hunting, where we can change query, remember to save it and close tab after saving.
Turn off - disabled but still on the list
Delete - disabled and deleted from the list.